Connect the Web Portal
Introduction
Web Portal allows you to create collections of files to share them with others. These collections are called shares. The creator and owner of a share is the only one that has the ability to edit or delete the share, or to update the list of its files. The owner can also invite other users to it or restrict the access.
Invited users can only view and download the files within the share, without having the ability to edit the shared content.
Shares can't just be created manually but also automatically by a PLOSSYS 4 printer.
Web Portal functionality also includes optional email notifications when a share gets contributed or accessed. These notifications can be disabled on a share-by-share basis. Email integration is optional for the Web Portal. If it isn't configured the Web Portal will not send emails.
Keycloak Configuration
If you are using an already existent Keycloak, execute the following steps to add the needed client and obtain the client secret.
Hint - SEAL Keycloak installation
SEAL Keycloak installation comes with a preconfigured client named seal-webportal for SEAL Web Portal. When using it, go to your Keycloak Admin Console. Under Clients select the seal-webportalclient and continue with step 3 of the instructions below.
-
Open Keycloak.
-
Select the
SEALrealm in the dropdown menue on the top left.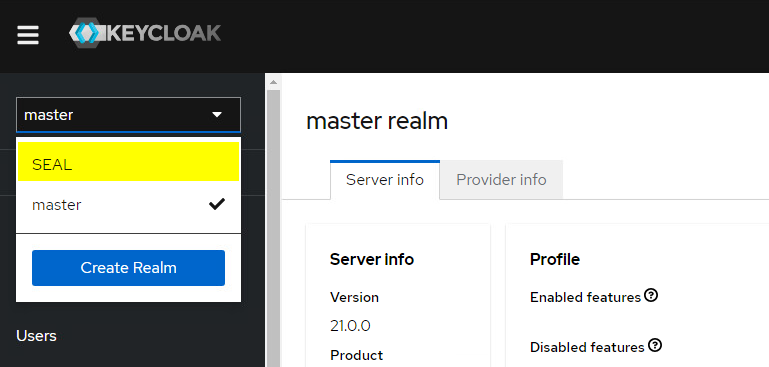
-
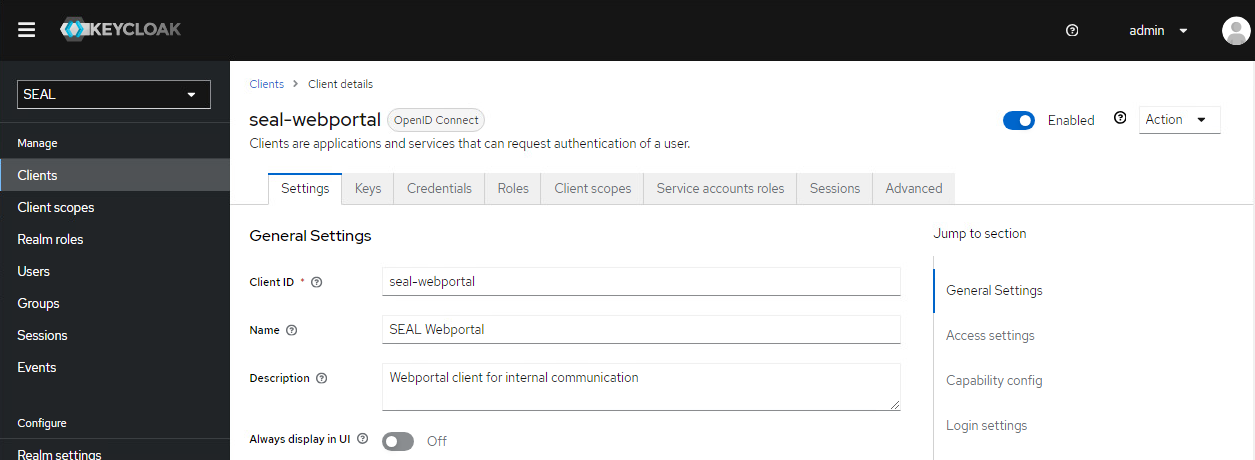
Check if the
seal-webportalclient exists. Otherwise create it with the following settings.-
General Settings:
-
Client ID: seal-webportal -
Name: SEAL Webportal -
Description: Webportal client for internal communication
-
Confirm with
Next. -
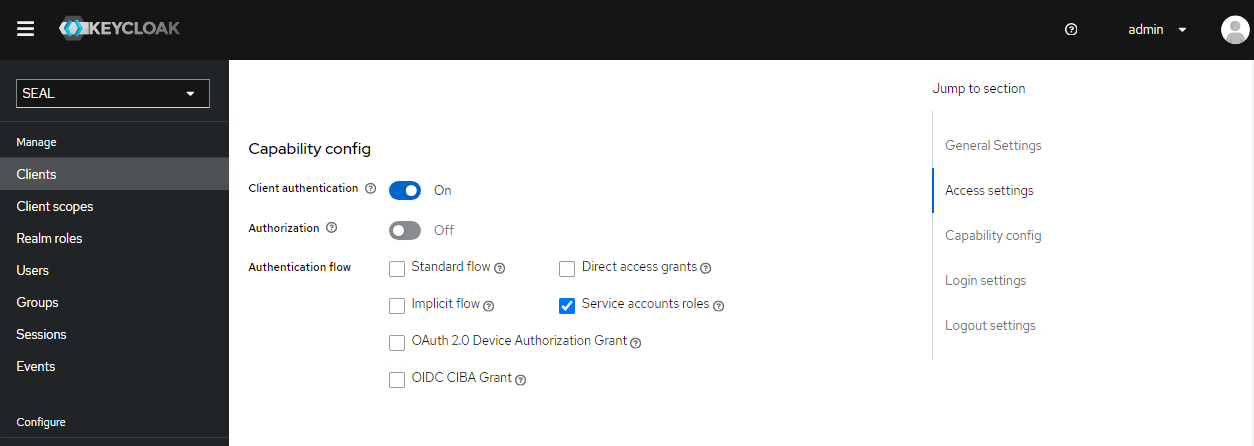
Capability Config:
-
Client authentication: ON -
Standard Flow: OFF -
Implicit Flow: OFF -
Direct Access Grants: OFF -
Service Account Roles: ON
-
Confirm with
Next. -
Click
Saveto save the client.
-
-
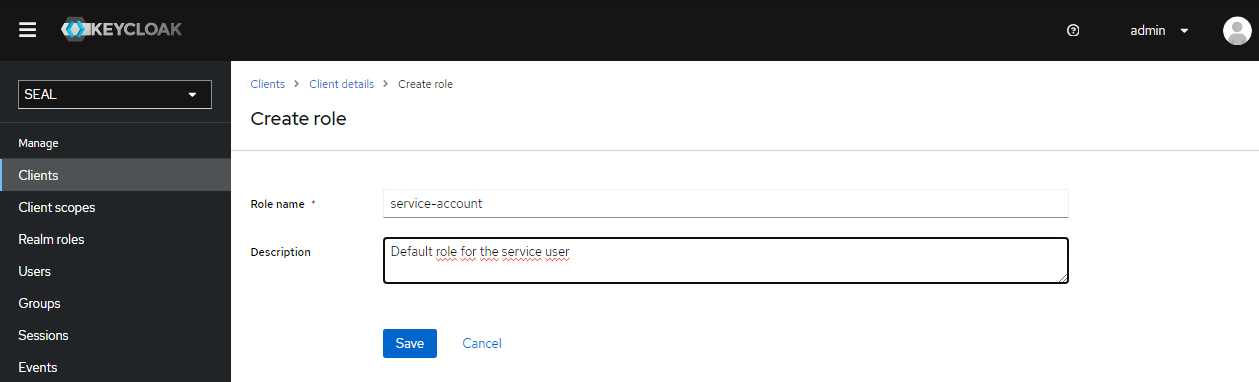
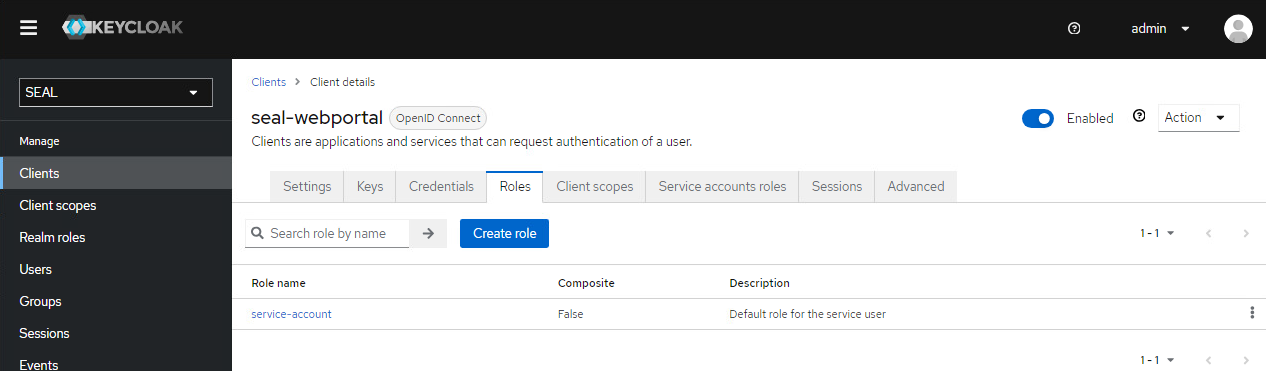
Switch to the
Rolestab for theseal-webportalclient. If the roleservice-accountdoes not exit yet, presscreate roleand add it with the following values: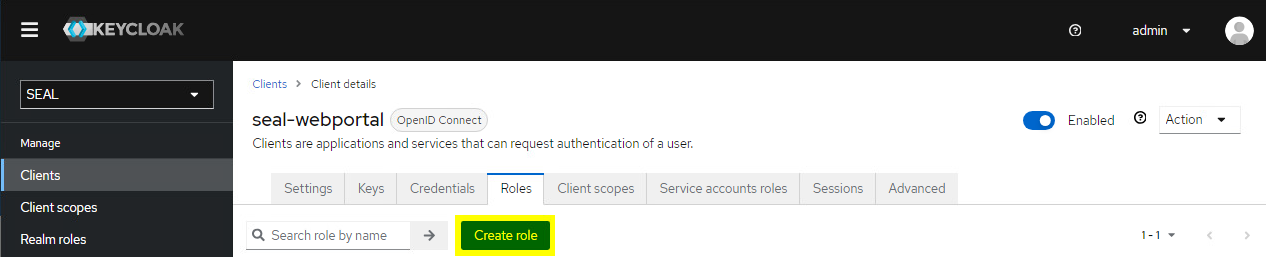
-
name: service-account -
description: Default role for the service user
-
-
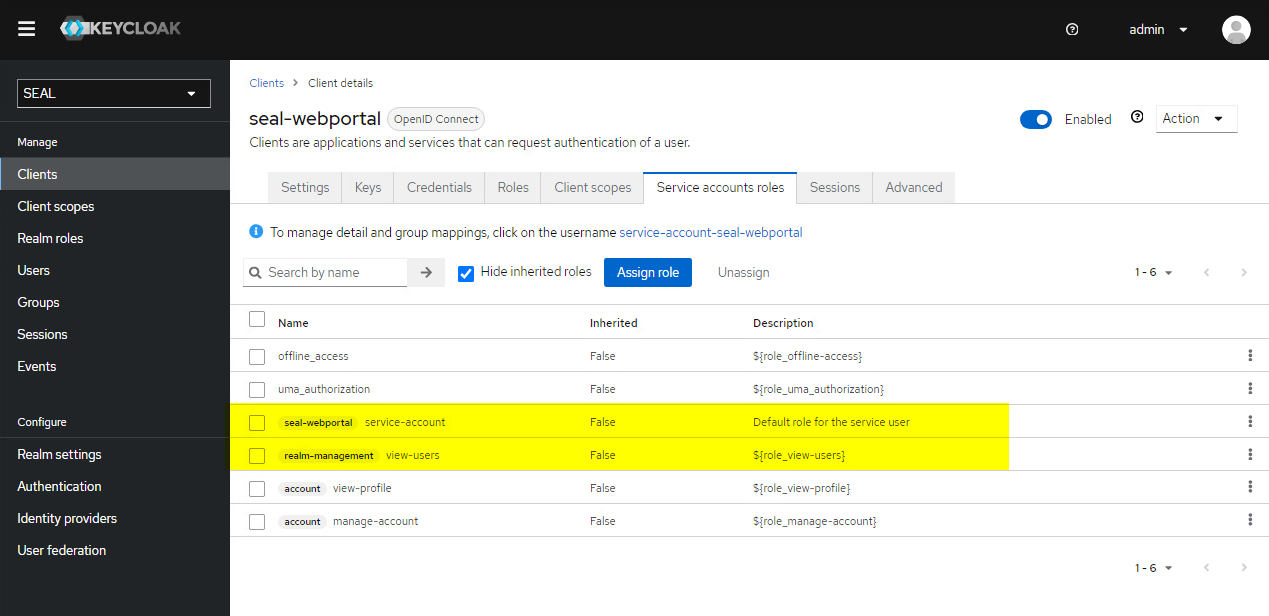
Go to the
Service accounts rolestab for theseal-webportalclient. Assign the following roles to the client, if they aren't already in the list:-
seal-webportal > service-account- used byALLOWED_OIDC_CLIENTS -
realm-management > view-users- used to convert user emails to keycloak uuids
To do so, click
Assign roleand changeFilter by realm rolestoFilter by clients. Select the roles and confirm byAssign.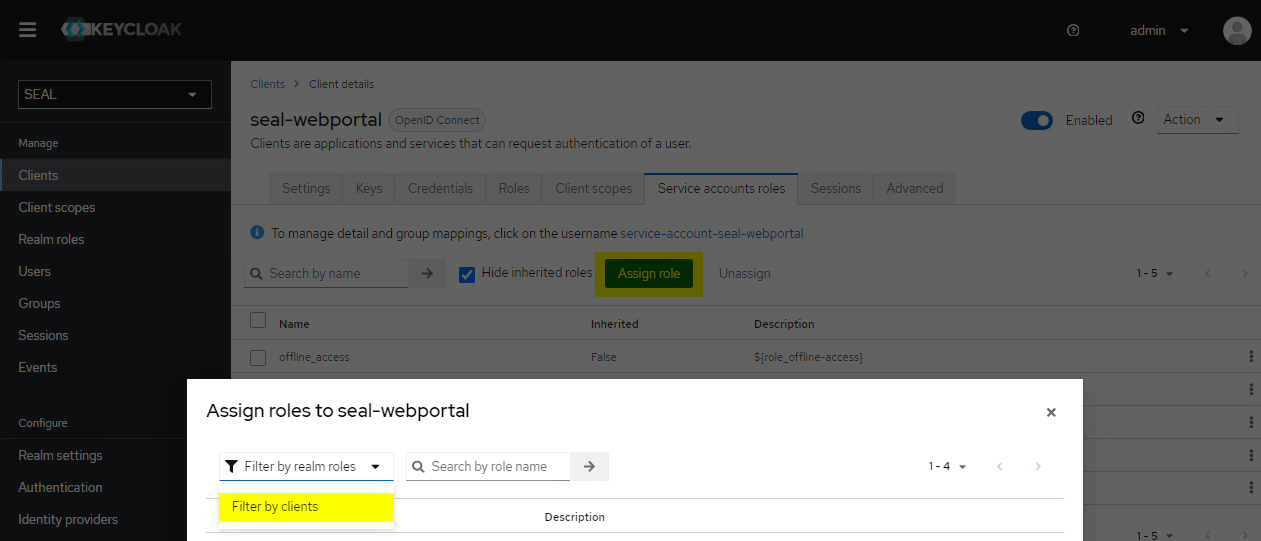
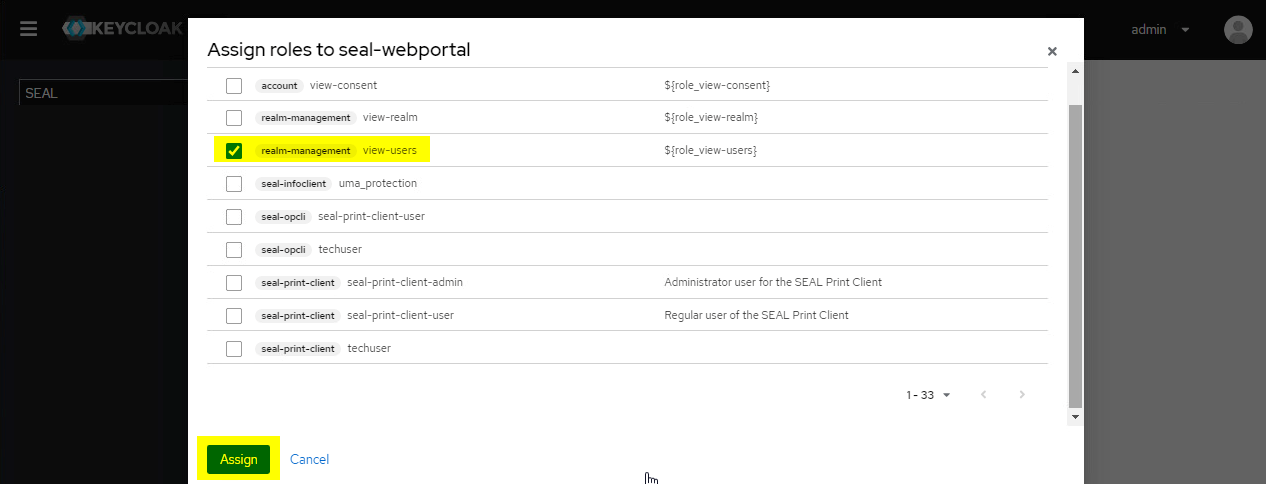
The final view should look like this:
-
-
Change to the
Credentialstab and copy the client secret for theseal-webportalclient. You will need it to configure the Web Portal connector next.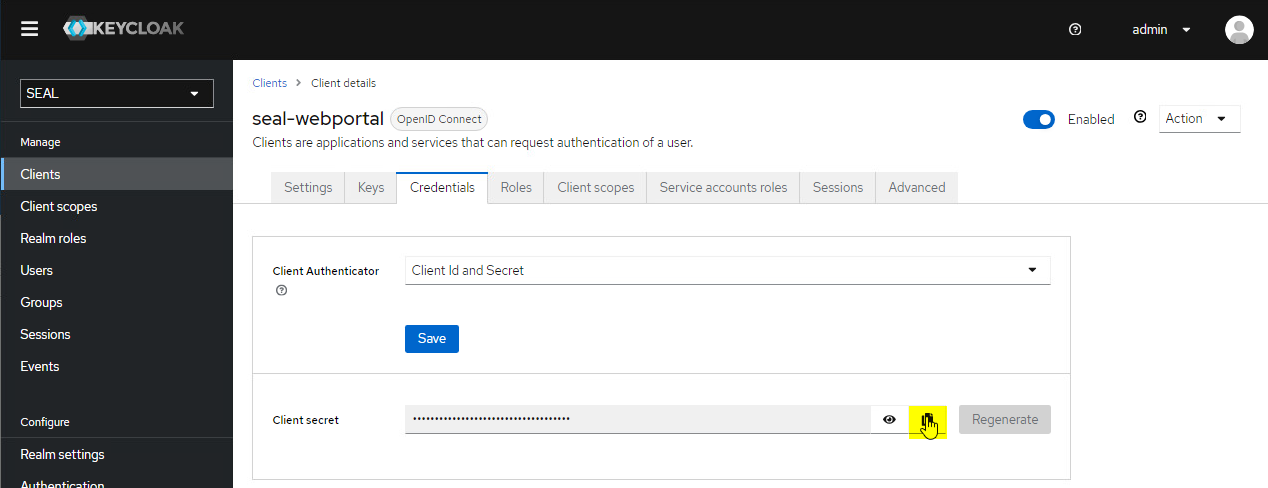


Configure the Connector
In SEAL Operator, activate the connector and specify the keys for the connection:
-
Open a Command Prompt or PowerShell.
-
Export the complete configuration of SEAL Operator from Consul to a YAML file with the following command. So you're making sure the current configuration settings are being used.
operator config export <filename>.yml --insecure -
Edit the exported file
<filename>.yml. -
In the section of the Web Portal (
webportal) connector, setcstatustoon.operator: connectors: ... webportal: cstatus: 'on' serviceName: operator-webportal url: 'https://localhost:3019' ... -
In the
envsection, specify the following keys for theoperator-webportalservice as needed:-
AUTH_PROVIDER: Type of authentification provider, eithergenericorkeycloak -
KC_ADMIN_BASE_URL: Keycloak auth endpoint URL ifkeycloakis specified asAUTH_PROVIDER -
KC_ADMIN_TARGET_REALM: Keycloak realm name ifkeycloakis specified asAUTH_PROVIDER -
MONGO_SERVER_URL: URL of the MongoDB -
OPERATOR_SERVER_URL: URL of the Operator server -
STORAGE_SERVICE_NAME: Name of the service that will store the entries with their associated content -
WEBPORTAL_CLIENT_ID: Client Id for retrieving access tokens as defined in Keycloak, e.g.seal-webportal -
WEBPORTAL_CLIENT_SECRET: Client secret for retrieving access tokens for the filestore as defined in Keycloak
env:
  service:
  ...
    operator-webportal:
      tag:
        any:
          AUTH_PROVIDER: keycloak
          KC_ADMIN_BASE_URL: https://localhost:32769
          KC_ADMIN_TARGET_REALM: SEAL
          LOG_LEVEL: debug
          MONGO_SERVER_URL: mongodb://localhost:27017/operator-webportal
          OPERATOR_SERVER_URL: https://localhost:3008
          STORAGE_SERVICE_NAME: operator-fileupload
          WEBPORTAL_CLIENT_ID: seal-webportal
          WEBPORTAL_CLIENT_SECRET: 1f86ba87-64f2-4c3f-9c92-bbd5befdf6f7
  ...
Hint - changed URL as of Keycloak 21.0.1
As of SEAL-specific Keylcloak version 21.0.1, the URL needed for KC_ADMIN_BASE_URL has changed.
- old value:
https://<hostname>:32769/auth - new value:
https://<hostname>:32769
Literature - keys
For further information about available keys, refer to the Key Reference.
-
-
Save the
<filename>.ymlfile and re-import it to Consul.operator config import <filename>.yml --insecure
Configure Roles (Optional)
In the OIDC identity provider, roles are configured to which the users will be assigned. In the configuration of the seal-operator-server and seal-operator-fileupload services, the permissions for the database entities are mapped to these roles. The specific permissions depend on the OIDC client.
The following OIDC clients are available in connection with SEAL Operator:
-
seal-print-clientfor SEAL Print Client -
seal-opclifor SEAL OP-CLI -
seal-webportalfor SEAL Web Portal
In the OIDC identity provider, roles are configured to which the users will be assigned. For example, in the preconfigured Keycloak from SEAL Systems, seal-print-client-user, techuser and service-account are available as roles.
The mapping of the permissions and the roles is specified as JSON object with the following key:
ALLOWED_OIDC_CLIENTS: Mapping of permissions to roles specified in the OIDC identity provider
Hint - maintainability
Although the key is available for several services and can be added for each of them, it is advised to consolidate all permissions in one entry at dc/home/env/service/any/tag/any/ALLOWED_OIDC_CLIENTS.
Hint - usage of Consul
Due to the possible complexity of the JSON string for ALLOWED_OIDC_CLIENTS it is advised to add or change its value via Consul (https://localhost:8500), which has an inbuilt JSON format validation.
In Consul the key is specified here: dc/home/env/service/any/tag/any/ALLOWED_OIDC_CLIENTS.
Hint - template for ALLOWED_OIDC_CLIENTS
SEAL Operator CLI has functionality to generate a template for this key.
operator config template ALLOWED_OIDC_CLIENTS --file template.json
Please note, that the template doesn't take the current value of this key into account. For further information refer to Administrate Configuration.
Available Keys and Values
This section explains the available keys and values of the json object for ALLOWED_OIDC_CLIENTS.
{
  "<oidc-client>": {
    "roles": {
      "<role-specified-in-oidc>": {
        "areas": {
          "documents": {
            "set-<name>": {
              "views": [selection of items>],
              "permissions": [<permissions>]
            }
          }
          "tasks": {
            "set-<name>": {
              "views": [<selection of items>],
              "permissions": [<permissions>]
            }
          }
          ...
        }
      }
    }
  }
}
-
<oidc-client>: On the top level of the JSON object, you specify the OIDC client as specified in your OIDC. Available values:seal-print-client,seal-opcliandseal-webportal.Hint - client names in the OIDC
It's adviced to use these exact client names in your OIDC. If that isn't possible you have to specify the client name in
AUTH_CLIENT_IDfor the respective service. -
<role-specified-in-oidc>: Withinroles, you specify the names of the roles specified in the OIDC identity provider. Available values in the preconfigured Keycloak from SEAL Systems are:seal-print-client-user,techuserandservice-account. -
areas: Available values:documents,lists,panels,shares,tasks -
set-<name>: Freely choosable name for readablity purposes only. -
<selection of items>: Within views, you specify the selection of items to which the permissions specified apply. Available values:["ALL"]stands for all items,[]stands for none of them. You can also limit the selection by combining the struct, value and operator keys. Available operators are "eq" for an exact matching between value and struct, and "wildcard" for a wildcard matching between value and struct. For this, value may contain *. -
<permissions>: Available values:impersonate
Examples
Example - configuration to enable the creation of documents, tasks, panels and Web Portal shares by a technical user on behalf of a real user (for example via a PLOSSYS 4 Webportal printer)
{
  "seal-print-client": {
      "roles": {
          "seal-print-client-user": {},
          "techuser": {
              "areas": {
                  "documents": {
                      "set-impersonate": {
                          "views": ["ALL"],
                          "permissions": ["impersonate"]
                      }
                  },
                  "tasks": {
                      "set-impersonate": {
                          "views": ["ALL"],
                          "permissions": ["impersonate"]
                      }
                  },
                  "panels": {
                      "set-impersonate": {
                          "views": ["ALL"],
                          "permissions": ["impersonate"]
                      }
                  }
              }
          }
      }
  },
  "seal-opcli": {
      "roles": {
          "seal-print-client-user": {},
          "techuser": {
              "areas": {
                  "documents": {
                      "set-impersonate": {
                          "views": ["ALL"],
                          "permissions": ["impersonate"]
                      }
                  },
                  "tasks": {
                      "set-impersonate": {
                          "views": ["ALL"],
                          "permissions": ["impersonate"]
                      }
                  },
                  "panels": {
                      "set-impersonate": {
                          "views": ["ALL"],
                          "permissions": ["impersonate"]
                      }
                  },
                  "shares": {
                      "set-impersonate": {
                          "views": ["ALL"],
                          "permissions": ["impersonate"]
                      }
                  }
              }
          }
      }
  },
  "seal-webportal": {
      "roles": {
          "service-account": {}
      }
  }
}
Example - techuser role with right for impersonation on all entities
{
  "seal-print-client": {
    "roles": {
      "seal-print-client-user": {},
      "techuser": {
        "areas": {
          "documents": {
            "set-impersonate": {
              "views": ["ALL"],
              "permissions": ["impersonate"]
            }
          },
          "lists": {
            "set-impersonate": {
              "views": ["ALL"],
              "permissions": ["impersonate"]
            }
          },
          "tasks": {
            "set-impersonate": {
              "views": ["ALL"],
              "permissions": ["impersonate"]
            }
          },
          "panels": {
            "set-impersonate": {
              "views": ["ALL"],
              "permissions": ["impersonate"]
            }
          }
        }
      }
    }
  }
}
Enable Public Link Access to Shares (Optional)
By default, access to shares created is limited to users of the OIDC. If you want to enable the reading access to anyone with the link, execute the following steps.
-
Open a Command Prompt or PowerShell.
-
Export the complete configuration of SEAL Operator from Consul to a YAML file with the following command. So you're making sure the current configuration settings are being used.
operator config export <filename>.yml --insecure -
Edit the exported file
<filename>.yml. -
In the
envsection, specify the following keys foroperator-webportalservice:-
ALLOW_SHARED_ENTRIES: Specifies if public Web Portal shares are enabled. Set it totrue. -
UI_BASE_URL: URL of the Web Portal UI. Only necessary if theshareLinkplaceholder is used in an email template and the automatic detection of this URL is prone to fail (e.g. when shares are created through a batch process).
env: service: ... operator-webportal: tag: any: ALLOW_SHARED_ENTRIES: true UI_BASE_URL: https://myserver.com:3000 ... -
-
In the
envsection, specify the keyPUBLIC_SERVICESforoperator-serverservice. Set its value to'operator-webportal'. If the key already contains a value, extend it. The key accepts comma-separated string values.env: service: ... operator-server: tag: any: PUBLIC_SERVICES: 'operator-webportal' ... -
Save the
<filename>.ymlfile and re-import it to Consul.operator config import <filename>.yml --insecure
Setup Email Service (Optional)
Web Portal supports email notifications, that get sent through the seal-email-service. Users will get an email when they get access to a new share, or when someone accesses a share that they own.
Notifications can be disabled on a per share basis, via the WebPortal panel inside the Operator UI.
To enable this functionality you need to specify the mail server in the email-service settings:
-
Open a Command Prompt or PowerShell.
-
Export the complete configuration of SEAL Operator from Consul to a YAML file with the following command. So you're making sure the current configuration settings are being used.
operator config export <filename>.yml --insecure -
Edit the exported file
<filename>.yml. -
In the
envsection, specify the following keys for theemail-serviceservice:EMAIL_FROM: Sender email addressSMTP_PASSWORD: Password for the SMTP user specified inSMTP_USERNAMESMTP_PORT: Port of the SMTP serverSMTP_SERVER: SMTP server nameSMTP_USERNAME: SMTP user name
env: service: ... email-service: tag: any: EMAIL_FROM: webportal@firma.de SMTP_PASSWORD: <smtp_password> SMTP_PORT: 25 SMTP_SERVER: 192.17.17.18 SMTP_USERNAME: webportal@firma.de ... -
In the
envsection, specify the following keys for theoperator-webportalservice:-
SHARE_ACCESSED_HTML: HTML of the email sent to the owner of a share when it gets accessed by an assigned user for the first time. -
SHARE_ACCESSED_SUBJECT: Subject of the notification email to be sent when a share gets accessed for the first time by an assigned user. -
SHARE_ACCESSED_TEXT: Text of the email sent to the owner of a share when it gets accessed by an assigned user for the first time. -
SHARE_ASSIGNED_HTML: HTML of the notification email sent to the assigned user(s) of a share. -
SHARE_ASSIGNED_SUBJECT: Subject of the notification sent to the assigned user(s) of a share. -
SHARE_ASSIGNED_TEXT: Plain text of the notification email sent to the assigned user(s) of a share.
Hint - usage of placeholders
The following placeholders are available:
-
{expirationDate}: Expiration date of the share. Only available forSHARE_ASSIGNED_HTMLandSHARE_ASSIGNED_TEXT. -
{shareId}: ID of the share. For the structure of public and private links refer to the examples forSHARE_ASSIGNED_TEXTat the key reference. If both, public and private links to shares should be sent, it is adviced to use the{shareLink}placeholder instead. -
{shareLink}: Automatically generated link to the share. Depending on whether the share is private or public either a private or a public link will be generated. -
{shareName}: Name of the share given by the creator of the share. -
{userName}: Name of the user who accessed the share. ForgenerictypeAUTH_PROVIDERthe user's name isn't available. The user's email will be inserted instead. Only available forSHARE_ACCESSED_HTMLandSHARE_ACCESSED_TEXT.
env: service: ... operator-webportal: tag: any: SHARE_ASSIGNED_SUBJECT: 'Share assigned' SHARE_ASSIGNED_TEXT: 'Hello! You received access to share: "{shareName}". You can access it via this link: {shareLink}.' SHARE_ASSIGNED_HTML: '<h1>Hello!</h1> <div><p>You received access to share: <b>{shareName}</b>.</p> <p>You can access it via this link: {shareLink}.</p></div>' EMAIL_SERVICE_URL: https://localhost:3030/v1 SHARE_ACCESSED_SUBJECT: 'Share accessed!' SHARE_ACCESSED_TEXT: 'Hello! {userName} accessed the share: "{shareName}". You can access the share via this link: {shareLink}.' SHARE_ACCESSED_HTML: '<h1>Hello!</h1> <div><p>{userName} accessed the share: <b>{shareName}</b>.</p> <p>You can access the share via this link: {shareLink}</p></div>' ... -
-
Save the
<filename>.ymlfile and re-import it to Consul.operator config import <filename>.yml --insecure
Create Shares
Shares can be created manually in the Web Portal panel of the user interface.
Additionally, in PLOSSYS 4, you can output documents directly to an on-the-fly created Web Portal share.
For detailed instructions, refer to Create Web Portal Shares.