Connect a PLOSSYS 4 System
At the PLOSSYS 4 server, the node-p4rest service has to be installed. In the SEAL Operator context, the PLOSSYS 4 (p4) connector is already activated by default. You still need to specify some connection keys in Consul and connect the user interface.
!!! caution "Caution - breaking change"
Starting with SEAL Operator version 1.5.0 `node-p4rest` version 6.0.0 or higher is required.
To connect a PLOSSYS 4 system as backend system for SEAL Operator, execute the following steps:
Install the node-p4rest Service
At the PLOSSYS 4 server, install the node-p4restservice:
-
In a browser, log on to the SEAL Systems delivery platform with your logon data:
https://delivery.sealsystems.de
Hint - logon data
You receive the logon data from your Technical Project Manager at SEAL Systems.
-
Download the node-p4rest-6.4.6-759.x86_64.rpm file from the SEAL Systems delivery platform. It is saved as
node-p4rest-6.4.6-759.x86_64.rpm. -
Install
node-p4rest-6.4.6-759.x86_64.rpm. With this, thenode-p4restservice will be installed.-
RHEL:
sudo yum install node-p4rest-6.4.6-759.x86_64.rpm -
SUSE:
sudo zypper install node-p4rest-6.4.6-759.x86_64.rpm
-
-
To declare system variables for the
node-p4restservice, edit the following file:/opt/seal/etc/node-p4rest.envHint - environment file for services
The path and name of the file containing the system variables are specified in the configuration file of the service. For its location, refer to Directories and Files on Linux.
-
Specify the following mandatory keys in
/opt/seal/etc/node-p4rest.env:-
AUTH_ISSUER_URL: OIDC issuer base URL -
ID_PROVIDER_NAME: Name of the OIDC identity provider -
PLSROOT: PLOSSYS 4 installation directory
Example - set system variables
AUTH_ISSUER_URL=https://localhost:32769/realms/SEAL
ID_PROVIDER_NAME=https://localhost:32769/realms/SEAL
PLSROOT=/opt/plossys
Hint - changed URLs as of Keycloak 21.0.1
As of SEAL-specific Keycloak version 21.0.1, the URL needed for
AUTH_ISSUER_URLandID_PROVIDER_NAMEhas changed.-
old value:
https://<hostname>:32769/auth/realms/SEAL -
new value:
https:/<hostname>:32769/realms/SEAL
-
-
Specify the following optional keys in
/opt/seal/etc/node-p4rest.envunless the respective default fits:-
ID_PROVIDER_CERT(optional): Path and file name of the certificate generated by the OIDC identity provider. This key is only needed if the automatic request of the certificate from the OIDC identity provider fails. -
INFOSERVER_URL(optional): URL of PLOSSYS Infoserver, defaultsocket://localhost:7125 -
PLSHOST(optional): Server name of PLOSSYS Infoserver, defaultlocalhost -
PLSPORT(optional): Port number of PLOSSYS Infoserver, default7125 -
PLSROOT(optional): PLOSSYS 4 installation directory, default same as the system variable $HOME -
PGHOST(optional): Server name of the PLOSSYS 4 PostgreSQL database used for the job reply, defaultlocalhost -
PGPORT(optional): Port number of the PLOSSYS 4 PostgreSQL database used for the job reply, default7128 -
RLIGATE(optional): Name of the target directory for the repro list files (rli, rlist), defaultrlipdmgate -
SERVICE_URL(optional): URL under which the service can be accessed
Literature - PLOSSYS 4 system variables
For further information about the PLOSSYS 4 system variables, refer to the PLOSSYS 4 System Description.
-
-
Restart the
node-p4restservice:sudo systemctl restart node-p4rest
Configure the Connector
In SEAL Operator, activate the connector and specify the keys for the connection:
-
Export the complete configuration of SEAL Operator from Consul to a YAML file. So you're making sure that the current configuration settings are being used.
operator config export <filename>.yml --insecure -
Edit the exported file
<filename>.yml. -
In the section of the PLOSSYS 4 (
p4) connector, setcstatustoon. The Fileupload (scratch) connector has to be activated as well.operator: connectors: ... p4: cstatus: 'on' serviceName: operator-p4 url: 'https://localhost:3010' scratch: cstatus: 'on' serviceName: operator-fileupload url: 'https://localhost:3009' ...Caution - do not turn off
Do not deactivate the Fileupload (
scratch) connector. The PLOSSYS 4 (p4) connector will not work otherwise!
Single PLOSSYS 4 Backend
-
In the
envsection, specify the following keys for theseal-operator-p4service:-
ACTION_EXECUTOR: Backend system, hereP4 -
PLOSSYS_URL: URL of the PLOSSYS 4 system to which SEAL Operator has to connect
env:
  service:
  ...
    operator-p4:
      tag:
        any:
          ACTION_EXECUTOR: P4
          PLOSSYS_URL: 'https://<plossys_4_server_name>:3011'
  ...
Literature - keys
For further information about available keys, refer to the Key Reference.
-
-
Specify the following optional keys if required:
-
APW_URL: URL of the APW REST server -
JWT_USERNAME: User name set in the JSON Web Token (JWT) -
PLOSSYS_TIMEOUT: Timeout for connecting and retrieving data from the PLOSSYS 4 system -
STAMP_META: Flag if additional sheets are stamped as well -
TARGET_CONTENT_TYPE: PLOSSYS 4-specific job format, repro list or set collation -
TARGET_FILE_KEY: Key where to put the names of local files when exporting to a repro list -
USER_NAME_KEY: Key where to put the name of the logged-in user when exporting to a repro list
-
-
Save the file.
-
Re-import it to Consul.
operator config import <filename>.yml --insecure
Multiple PLOSSYS 4 Backends
In case of multiple PLOSSYS 4 backends, they are defined in the SYSTEMS subsection of the operator-p4 environment. It is strongly recommended to make those changes by exporting the existing configuration to a YAML file, adding the entries and re-importing the configuration. For details how to make those changes in Consul see the hint below.
-
In the
envsection, specify the following keys for theseal-operator-p4service:-
ACTION_EXECUTOR: Backend system, hereP4 -
SYSTEMS: Section containing a list of PLOSSYS 4 systems. Every list entry stands for a P4 system. In YAML format every list entry starts with a dash (-). When using Consul to make those changes another indexed subsection for every system is needed. For more details see the hint in the next step.
-
-
Below the
SYSTEMSsection specify the following keys:-
PLOSSYS_URL: mandatory; URL of the PLOSSYS 4 system to which SEAL Operator has to connect -
PLOSSYS_NAME: optional; Arbitrary unique name for backend system, default is hostname inPLOSSYS_URL -
TARGET_CONTENT_TYPE: optional; PLOSSYS 4-specific job format, repro list or set collation -
TARGET_FILE_KEY: optional; Key where to put the names of local files when exporting to a repro list -
USER_NAME_KEY: optional; Key where to put the name of the logged-in user when exporting to a repro list
Example yaml file:
env:
  service:
  ...
    operator-p4:
      tag:
        any:
          ACTION_EXECUTOR: P4
          SYSTEMS:
            - PLOSSYS_NAME: <system_1_name>
              PLOSSYS_URL: 'https://<plossys_4_server_1_name>:3011'
            - PLOSSYS_NAME: <system_2_name>
              PLOSSYS_URL: 'https://<plossys_4_server_2_name>:3011'
  ...
Hint - structure in Consul
When setting the key via Consul another indexed subsection is needed since Consul doesn't know enumerations.
The same configuration as above transformed to Consul structure:
env:
  service:
    operator-p4:
      tag:
        any:
          SYSTEMS:
            0:
              PLOSSYS_NAME: <system_1_name>
              PLOSSYS_URL: 'https://<plossys_4_server_1_name>:3011'
            1:
              PLOSSYS_NAME: <system_2_name>
              PLOSSYS_URL: 'https://<plossys_4_server_2_name>:3011'
The
PLOSSYS_URLfor the first system in Consul UI. Take notice of the emphasized breadcrumb line on top: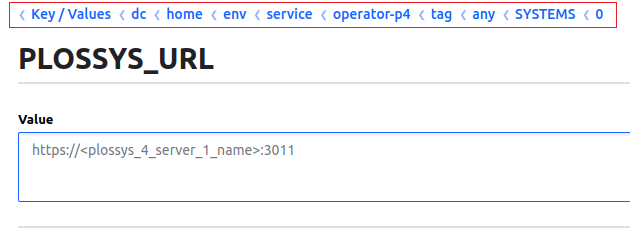
-
-
In the
envsection, specify the following connector-specific keys for theseal-operator-p4service if required.-
APW_URL: optional; URL of the APW REST server -
JWT_USERNAME: optional; User name set in the JSON Web Token (JWT) -
PLOSSYS_TIMEOUT: optional; Timeout for connecting and retrieving data from the PLOSSYS 4 system -
STAMP_META: optional; Flag if additional sheets are stamped as well
Literature - keys
For further information about available keys, refer to the Key Reference.
-
-
Save the file.
-
Re-import it to Consul.
operator config import <filename>.yml --insecure -
Make sure every PLOSSYS 4 backend system has a
node-p4restservice installed and running.

Connect P4 Pannel
To connect the P4 pannel, you need to specify the logon data for PLOSSYS 4 in the user interface:
-
In a browser, call the following URL to open the user interface and log on to it.
https://<operator_server>:3000 -
Open the
Server Settingsby selectingSettingsin the user menu.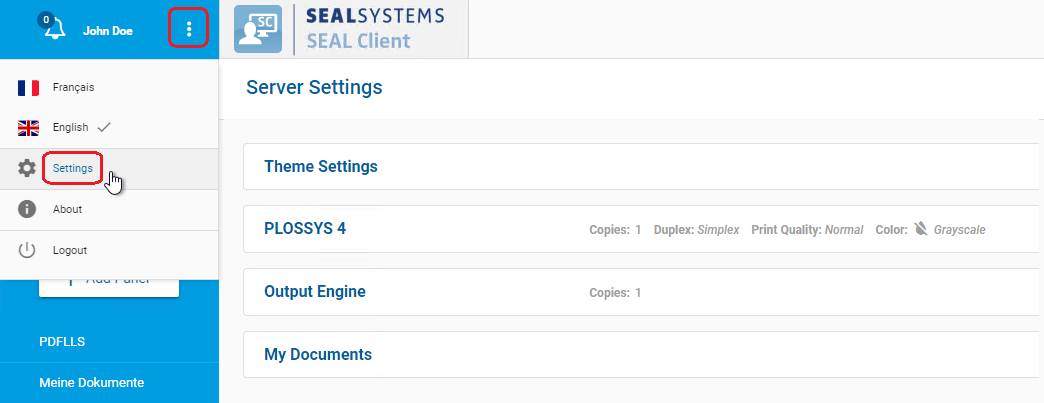
-
In the
PLOSSYS 4section of the server settings, change to edit mode, specify user name and password and save the settings.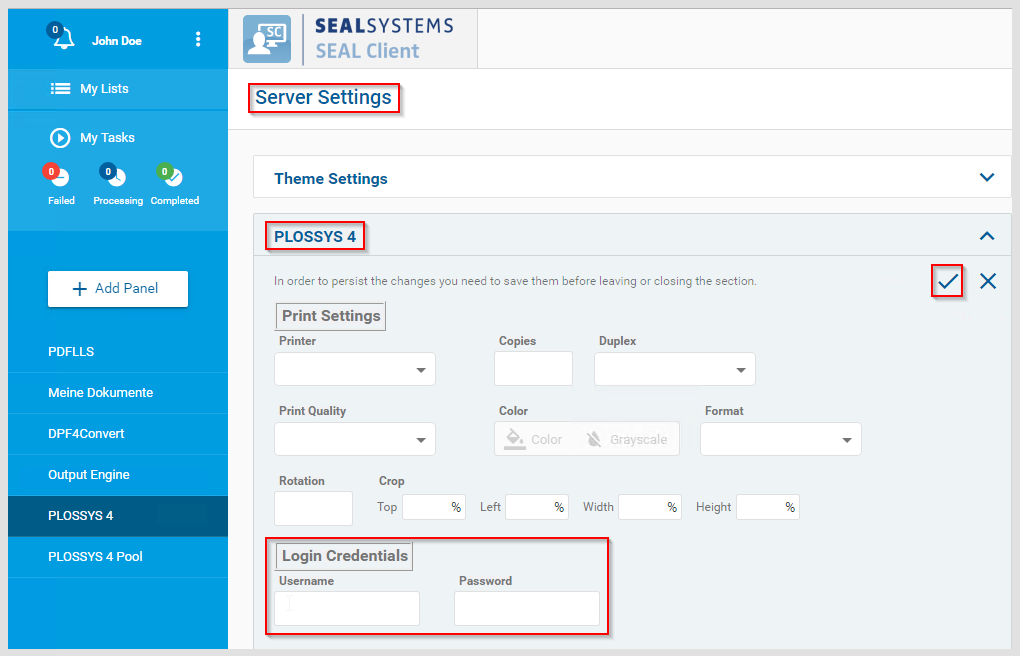


Configure the Panel (Optional)
The PLOSSYS 4 panel pre-configuration comes with some standard parameters already set. But it is normally not sufficient to replace an existent P2P or PAD installation. For how to customize the panel, refer to PLOSSYS 4 Panel Customization.